Saturday, May 7, 2011

HACMP Complete Configuration

HACMP Complete Configuration
Check the filesets:
labserver101:/usr/es/sbin/cluster > lslpp -l grep rsct
labserver101:/usr/es/sbin/cluster > lslpp -l grep cluster
labserver101 /etc/hosts :
16.138.184.177 labserver101
16.138.184.171 labserver101_svc
10.1.1.1 labserver101_boot
11.1.1.1 labserver101_stdby
16.138.184.181 labserver201
10.1.1.2 labserver201_boot
11.1.1.2 labserver201_stdby
labserver201 /etc/hosts :
16.138.184.177 labserver101
16.138.184.171 labserver101_svc
10.1.1.1 labserver101_boot
11.1.1.1 labserver101_stdby
16.138.184.181 labserver201
10.1.1.2 labserver201_boot
11.1.1.2 labserver201_stdby

From Labserver101 - > Smitty hacmp -> Extend Configuration -- Define the Cluster name
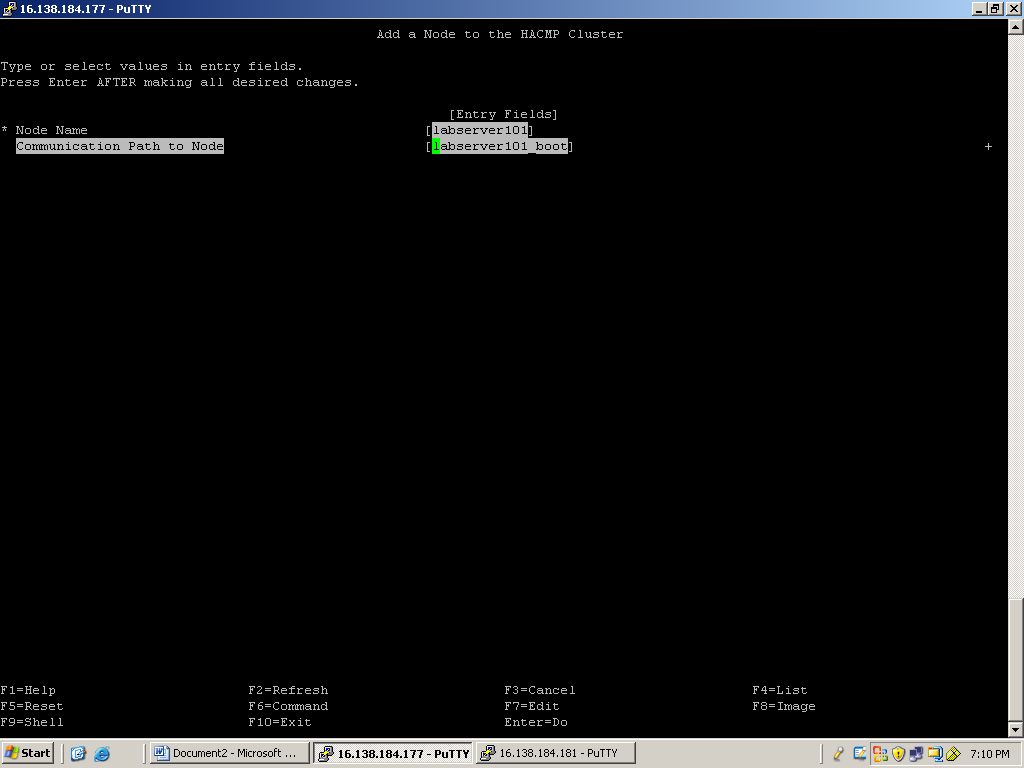


RG Name : saprg
Participating nodes : labserer101 labserver201


Enhanced concurrent Vg creation From Labserver101
labserver101:/usr/es/sbin/cluster > lspv grep hdisk1
hdisk1 0005e8e07d6b9991 None
labserver101:/usr/es/sbin/cluster > lspv grep 0005e8e07d6b9991
hdisk1 0005e8e07d6b9991 None
labserver201:/usr/es/sbin/cluster > lspv
hdisk0 0005e8d2c756518f rootvg active
hdisk1 0005e8e07d6b9991 None
labserver201:/usr/es/sbin/cluster > lspv grep 0005e8e07d6b9991
hdisk1 0005e8e07d6b9991 None


labserver101:/usr/es/sbin/cluster > lsvg
rootvg
testvg
labserver101:/usr/es/sbin/cluster > lsvg -o
rootvg
labserver101:/usr/es/sbin/cluster > ls -l /dev/hdisk1
brw------- 1 root system 17, 1 Jul 01 18:55 /dev/hdisk1
labserver201:/dev > ls -l /dev/hdisk1
brw------- 1 root system 17, 1 Jun 29 14:45 /dev/hdisk1
Create the file system /oracle in testvg
Lv01 -> /oracle


labserver101:/usr/es/sbin/cluster/utilities > ./cltopinfo
Cluster Name: hpcluster
Cluster Connection Authentication Mode: Standard
Cluster Message Authentication Mode: None
Cluster Message Encryption: None
Use Persistent Labels for Communication: No
There are 2 node(s) and 1 network(s) defined
NODE labserver101:
Network net_ether_01
labserver101_svc 16.138.184.171
labserver101_boot 10.1.1.1
labserver101_stdby 11.1.1.1
NODE labserver201:
Network net_ether_01
labserver101_svc 16.138.184.171
labserver201_boot 10.1.1.2
labserver201_stdby 11.1.1.2
Resource Group saprg
Startup Policy Online On Home Node Only
Fallover Policy Fallover To Next Priority Node In The List
Fallback Policy Fallback To Higher Priority Node In The List
Participating Nodes labserver101 labserver201
Service IP Label labserver101_svc


labserver101:/usr/es/sbin/cluster > lssrc -ls clstrmgrES
Current state: ST_STABLE
sccsid = "@(#)36 1.135.1.82 src/43haes/usr/sbin/cluster/hacmprd/main.C, hacmp.pe, 52haes_r541, 0747B_hacmp541 11/13/07 10:40:55"
i_local_nodeid 0, i_local_siteid -1, my_handle 1
ml_idx[1]=0
There are 0 events on the Ibcast queue
There are 0 events on the RM Ibcast queue
CLversion: 9
local node vrmf is 5410
cluster fix level is "0"
The following timer(s) are currently active:
Current DNP values
DNP Values for NodeId - 0 NodeName - labserver101
PgSpFree = 0 PvPctBusy = 0 PctTotalTimeIdle = 0.000000
DNP Values for NodeId - 0 NodeName - labserver201
PgSpFree = 0 PvPctBusy = 0 PctTotalTimeIdle = 0.000000


labserver201:/usr/es/sbin/cluster > lssrc -ls clstrmgrES
Current state: ST_INIT
sccsid = "@(#)36 1.135.1.82 src/43haes/usr/sbin/cluster/hacmprd/main.C, hacmp.pe, 52haes_r541, 0747B_hacmp541 11/13/07 10:40:55"
labserver201:/usr/es/sbin/cluster >


Hot Plug SAS disk drive replacement Procedure

Hot Plug SAS disk drive replacement Procedure
Check the “Hardware Location Code” of the failed hard disk


Run Diag


Select “Task Selection” and press enter


Select “Hot Plug Task” and press enter


Select “SCSI and SCSI RAID Hot Plug manager” and press enter


Select “Replace/Remove a Device Attached to an SCSI Hot Swap Enclosure Device” and press enter


Select the Failed disk( Example: hdisk1) and “don’t press enter” and inform to Onsite team .
Onsite team replaces the Hard disk and will inform to you.


Once you get the confirmation from onsite team press enter
Then slot 2 is populated.


Perform cfgmgr, check the new hard disk using lspv.
Change the PVID.


Assign it to rootvg using extendvg


Mirror the rootvg


Sync the rootvg


Moving Disk from one VIO client to another

Moving Disk from one VIO client to another


  • If you want to move hdisk1 from VIO_ClientA to VIO_ClientB.

  • Take the backup of /etc/filesystems on VIO_ClientA

  • Stop the DB and APP on VIO_ClientA

  • Move all the LP's from hdisk1 to hdisk2 and hdisk3 using migratepv hdisk1 hdisk2 hdisk3.

  • Check any LP's left in hdisk1 or not using lspv -l hdisk1

  • Take the PVID of hdisk1 using lspv grep -i hdisk1

  • Remove the hard disk from VIO_ClientA using rmdev -Rdl hdisk1

  • On VIO server find the related disk using lspv grep -i "hdisk1 PVID"

  • Find the VTD of Physical volume.

  • From VIO remove the VTD using rmvdev -vtd vtscsi10

  • On VIO Create virtual device with the hdisk on VIO_ClientB using mkvdev -vdev hdisk10 -vadapter vhost3

  • On VIO_ClientB run cfgmgr and assign the new disk to volume group using extendvg datavg

AIX Patch Upgradation

AIX Patch Upgradation


  • Take TSM backup for all File systems on AIX servers

  • Take mksysb backups .

  • Take all Configuration backup .

  • Take snapshot of HACMP configuration: smitty cm_cfg_snap.

  • Upload all downloaded file sets from IBM web site .

  • Remove the second disk from the mirror: # unmirrorvg rootvg hdisk1

  • Check if there are any LVs left on the second disk: # lspv -l hdisk1

  • If exists migrate the remaining LVs to the first disk: # migratepv hdisk1 hdisk0

  • Remove the second disk from the root VG, to do this need to clear the boot record of the second PV: # chpv -c hdisk1

  • Check if the bootlist is first set of the disk with the current rootvg, and on second place of the disk with the alt_disk_install: # bootlist -m normal hdisk0 hdisk1

  • Remove the second PV from rootvg # reducevg rootvg hdisk1

  • Run alternate disk installation: # nohup alt_disk_install -B -C hdisk1 &

  • After successful end of above operation test alternate disk installation (using wakeup key) # alt_disk_install -W hdisk1

  • List the content of PV # lspv -l hdisk1

  • Once all is fine, start the installation with the following commands “sleep” # alt_disk_install –S

  • Run the preview using smitty update_all and check the required /usr file system space and increase it.

  • Add new boot image to the first PV to have “fresh” boot record: # bosboot -ad /dev/hdisk0

  • Stop the cluster services using smitty cl_stop with option both[ Note: check the cluster log in /tmp/hacmp.out and the servers login with the boot IP.]

  • Before start installation should commit all the softwares, installed on the server to make easy roll-back in case of any problems during installation. # smit commit or # installp -c all

  • Update all the software from TL and Service pack # smit update_all

  • Set only apply package, but not commit and keep the copy of replaced files.

  • Reboot both the servers

  • Start the cluster using smitty cl_start. Check the logs in /tmp/hacmp.out
    Roll Back Plan

  • If any problem occurs change the boot disk: bootlist –m normal –o

  • Reboot the server.

  • Start the cluster services